NavPages

Tuesday, October 28, 2014

Featured on Studio 5 "Tree Slice" holiday ideas

Today West Creek Design was featured on Studio 5, showcasing great ideas to add rustic warm charm into your holiday decor with wood slices or tree discs.

First things first.... I want to give a shout out to my favorite boutique for dressing me and helping me look so fabulous on the show! Have you heard of Kendalljane Boutique?! They have the most fabulous clothes and amazing prices, you just can't go wrong with them. On Studio 5 today I wore their new Red Plaid Tunic! Not only is it extremely comfortable, it's so flattering on! You can wear it by itself or add some layers to it like I did. It's a must have for Fall and  right now you can get it on their site here! For only $31.99 you don't want to miss out on this top!


Right now they are offering West Creek Design fans 10% OFF their entire purchase!
Use code :WCD10 at checkout! So head on over there, I'm sure you'll find something you'll LOVE!


Now on to great ideas for your holiday decor using regular old wood slices. I first discovered this darling wood slice wreath.

found here on Pinterest. 

I knew it would be a great transitional wreath for fall all the way until Thanksgiving.  As I gathered the supplies, I found all the wood I needed piled up next to my Mother-in-law's shed. With her permission I grabbed as much wood as I could and knew that I couldn't stop at just the wreath.

I used my miter saw to cut the wood slices. You have to be so careful while your cutting the wood. Having knots in the wood and different thicknesses can sometimes cause the miter saw to grab the wood and throw it, or cause your hand to slide into the blade. ALWAYS clamp the wood so that it's completely secure and won't move on you when you're making the cuts with the miter saw. 

If by chance you don't have access to a wood pile or a miter saw, you can purchase wood slices on both Amazon or Etsy. I was able to grab some wood slices from Rustic Wedding Supply via Amazon here. I was very happy with the wood slices and the shipping was great. There are many other vendors and options available online. I also ordered biodegradable craft rings here via Amazon, for the base of the wreath. These are compressed MDF like material that the wood slices adhere to really well with the Gorilla wood glue. The wreath was extremely easy to put together as shown on the Studio 5 segment.


Once I had all the wood sliced, ideas poured into my head.  I loved taking each individual wood slice and stamping it with snow flakes, drilling a hole in the top and tying it with jute for Christmas ornaments.


I also made coasters with the individual wood slices stenciling numbers on, and then covering the coasters with polyurethane to seal the wood.

One of my favorite ideas was to make place card holders. I took the wood branch and instead of cutting small slices, I cut chunky ones, and then used a dremel saw to cut a deep line across the top of each piece of the chunky wood slice. I love the rustic element this adds to a a table setting.


A great neighbor gift for the holidays are these adorable push pins. I took a small branch and cut baby wood slices out of it with my miter saw. I then took a small finishing nail that was twice as wide as the wood slice and pounded the nail all the way through so that the sharp edge stuck out on the other side....tada a wood slice push pin.


I found a great chunky wood slice at Hobby Lobby. I took a drill bit and drilled a hole in the middle of the wood slice. I then took my jig saw and went from the hole I made in the middle of the wood slice and hollowed out a circle to make a wreath shape. I took a palm sander and sanded the middle so that it was smooth. This gave it the wreath shape. I decided to spice things up and paint the inside of the wreath gold and a small edge of the outside circle. I finished it off by hanging it with a burlap ribbon. This is one of my favorite projects using a wood slice.


Without the middle cut, this wood slice makes an excellent staging piece. Whether it's for a center piece or as a plate charger. I love the possibilities of the texture and height it can give.


Also using store bought wood slices, I applied orange craft paint to the middle and then used a paint stir stick as a stem to turn them into a pumpkin collage.


I very excited about the stocking holders made from a chunky log. I used a small branch and clipped off the stems for the stocking holder hooks. This was so simple to make but will have a huge impact on my mantel this holiday season.


Thanks again to Studio 5 and Kendalljane Boutique for hosting West Creek Design and this fabulous segment. I hope you're as excited as I am for the upcoming holidays. If there is any interior design or staging needs that you might have, West Creek Design would love to help. Contact me at westcreekdesign@gmail.com.


Friday, October 24, 2014

Mrs R's Great Room/ Kitchen final reveal

Yesterday's post left off with Mrs R's finished kitchen. On to the Dining Nook and then the Family Room.

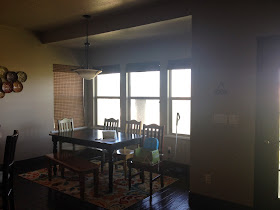
The original design budget did not leave enough room for a new Dining Room table and chairs. Thankfully Mrs R was able to find a gently used, beautifully made table from The Black Goose at a deeply discounted price. The table has a grey wash finish and fit perfect in the Dining Nook. To add a little bit of the unexpected, we chose a settee for one side of the table and accented it with bright yellow pillows that matched the fabric of the bar stools. The other side of the table has a bench with a contrasting red fabric cushion. The cream captain (end) chairs are my favorite, and are something that was picked up from a discount website. I love the design on the backs of the chairs!! A red and white striped rug was purchased to ground the space. The dining nook was then finished off with a geometric shaped mirror. The reflection of the mirror brings in the light from the windows, fun pops of color from the Family Room, and a glimpse of the crystals from the chandelier that hangs directly above the dining room table. Here is a before and after of the Dining Nook space.

Before

After


In between the Kitchen/Dining Nook and Family Room is a large space by the back door. Mrs R has a vintage hutch cabinet that she repainted a robins egg blue to match the color in the Dining Nook. This is a great piece of furniture that is unique, and adds character to the long wall of windows in the Family Room.  A few accessories including a custom pallet sign from West Creek Design is a beautiful welcoming site as you enter the Great Room/ Kitchen. 

Before


On the other side of the back door we added a wreath over a lantern sconce.  


We then dressed up the long Family Room wall of windows, that are now framed with shutters, with two curtain panels on each end. This helps tie in the color scheme of the space. I also found an old wood bench that Mrs R spray painted yellow to fit perfectly under the row of windows. A cozy reading chair now occupies the empty space of wall next to the fireplace with a metal R hanging where the clock used to be.

Before


After


The fireplace is really the show piece of the Great Room. The mantel is substantial and chunky and  needed something large to fill the space. I found a discounted clock at Home Goods, and Mrs R sprayed it a cherry tomato red to make it pop against the dark rock background. We then added custom reclaimed wood shutters by West Creek Design on each side.  To brighten the space even more we added a topiary to each side of the fireplace that sit in a yellow wooden box on the hearth stone.

Before


After


Next to the fireplace is the entertainment console and TV. Before, the console seemed small and underwhelming. One of my favorite finds during this design was a media console at Sam's club....yes that's right Sam's Club.  After searching for a media console and not being impressed with what we could find in Mrs R's price range, I came across this beauty one day shopping, and  called her immediately for approval. It's real wood, nothing laminated and the doors have darling glass panes on the front. It has plenty of room for all the families electronic devices too.  I helped Mrs R paint it with the same Annie Sloan chalk paint as her kitchen island "Old White". I love how it turned out!!! We then accessorized it to bring in more color to the space.

Before


The final spot of the Great Room was the couch area.  It really needed some color.  I found a great light blue and white rug with a geometric print to help ground the space . We then accented the same color scheme throughout by adding throw pillows to the couch. Before Mrs R had a desk behind the couch that was used as a catch all. To eliminate the clutter we replaced the desk with a custom made sofa table in the same cherry tomato red as the clock on the fireplace. This is such a great piece of furniture to add color to, and allowed the red color to flow throughout the entire Great Room and Kitchen space, tying it all together. 

Before


After


 Mrs R is a wonderful client. I had so much fun getting to know her better and helping her transform her Great Room/Kitchen. Contact me at westcreekdesign@gmail.com if  you would like help transforming your space.

A special thank you to MaryAnn and Stacey with Photographydotmom, for photographing the finished space. Check out these talented photographers at 
photographydotmom.blogspot.com


Once again, here are a few of my favorite shots from today...